
A Study of Bell Casting and Tuning
- sirelesar
- Mar 3, 2024
- 12 min read
Updated: Mar 6, 2024

The Black Death Bell, created by Peter de Weston ca 1340 (3)
Introduction:
Bells were an integral part of life in the Middle Ages. They were used in announcing the time in a community, calling parishioners to prayer, communicating over extended distances, and providing a warning of imminent danger. Bells were most often hung in the community church, placed in harbors and on seafaring vessels. Bell making was an art established in XX, yet the science of pre-determining the sound based upon a given profile would not be established to sometime around the 15th Century.
The techniques used in casting bells have not changed substantially since their early roots. The materials employed have also been consistent for thousands of years, with bronze-body bells pre-dating those made from steel. For the bronze bells, once the ratio of copper and tin was established for maximizing acoustic resonance, the constituent materials changed very little over the centuries.
Creating a particular tone from a bell was originally established by trial and error, and some post-tuning of the cast bell form. The resulting internal and external profiles were then recorded on templates for subsequent use. Within the documentation available from the 12th Century, we know that the relative tones between bells could be established by ratioing the weight of metal used in casting the bells. However, it is not apparent that the overall geometry could be pre-determined to produce a desired tone until sometime between the 12th and 16th Century. The first known writing establishing this relationship is ‘De la Pirotecnia’ by Vannoccio Biringuccio (2) in 1540.
In this study, my goal is to first cast a bell using the methods described in Theophilus’ ‘On Divers Arts’(1), which is a collection of techniques for crafting metals, glass and other hard arts from the 12th Century. For this part I will endeavor to learn the nuances of large-scale bell casting using these early techniques. For this effort, I have chosen to replicate the ‘Black Death Bell’3 created by Peter de Weston of London circa 1340. This bell is a prime example of bell shapes of the high Middle Ages. My casting will be ½ scale in outside dimensions of the original bell while attempting to replicate the primary tone of the original.
Secondly, I will use this casting exercise to explore the relationship between the geometry of the bell and its tone(s). Biringuccio describes a relationship between various shapes and the resulting tone, but even then, this relationship is based on practice and not on mathematical equation. By using a modern study of historical bells4 which establishes formulas for this relationship, I will attempt to pre-determine the sound of the replicated scaled bell to match the original tone of the Black Death Bell. I expound on bell sound theory and the correlation of historical geometries and tones within the dissertation on this subject. This study is focused on bronze bells and will omit steel bells.
Finally, I am creating a gift to commemorate the reign of Ragnar and Mary Isabel, King and Queen of Atlantia within the Society of Creative Anachronisms, Kingdom of Atlantia Anno Sociatatus LVIII. This gift will be presented as both an Undine award by Her Majesty and a personal bell for Her. It is with Her inspiration that this endeavor of study was initiated.
Approach:
Theophilus’ methods of casting the bell were generally as follows:
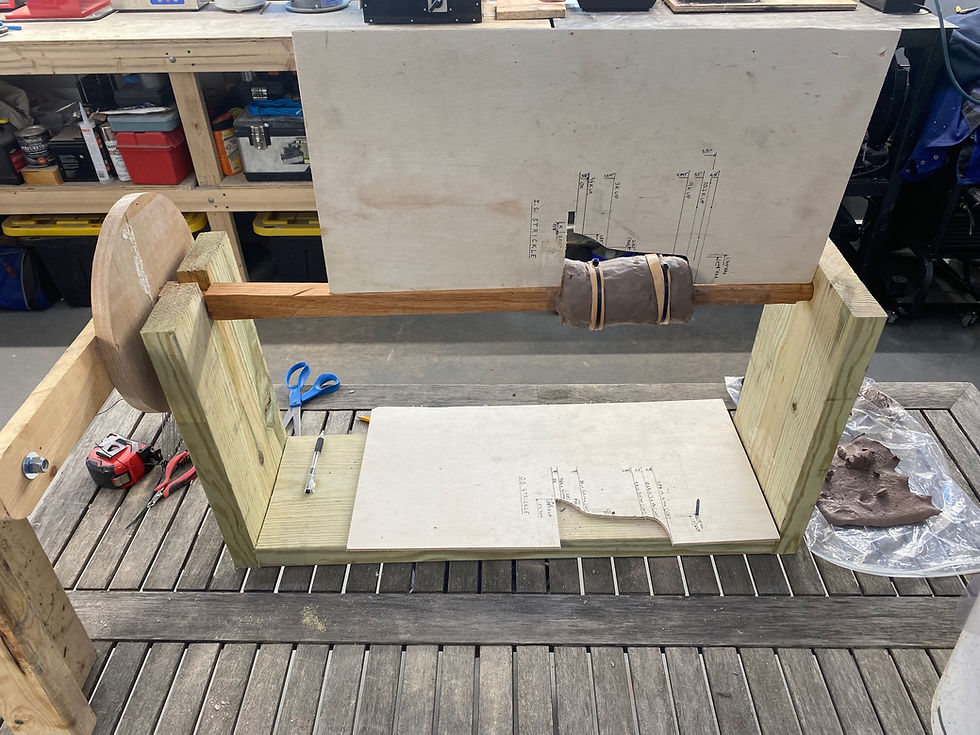
First, a square bar of wood in a wooden frame is made with a hand crank on one end of the bar (Figure 1). Clay is applied to the bar in intermittently dried layers and turned on the crank to form the interior profile of the bell. Then wax or tallow is placed around the core that will represent the metal bell once cast. This includes the embellishments on the outside of the bell. The wood crank bar is removed, and a steel loop is placed inside the bell interacting with the wax, which will become the cast-in-place clacker support. A wax patch is placed over the hole where the rod came out, and external steel loops are applied to create the bell support. Then finely sifted clay is placed on the outside of the bell to capture the details of the wax in the final mold. This is followed by the application of enough raw clay to create a rigid mold capable of sustaining the hydrodynamic pressure of the molten metal while it is poured. This mold is placed in the ground surrounded by fire brick. Using a fire around the mold, the wax is melted out leaving a void to accept the molten metal. A mixture of 4 parts copper and 1 part tin are melted, which is the basis of the alloy known as Bell Bronze (78% Cu 22% Tn by mass). They are mixed and poured into the cavity once occupied by the wax. Finally, when cooled, the core is removed, and eventually the outside clay is removed. Thus, the bell is formed with the external bell supports and internal clacker loop embedded within the bell bronze. The yoke support system is then created using hardwood and steel as depicted in Figure 2.
The scaled reproduction of an historical bell:
The Black Death Bell is 445 mm (14”) high, 360mm (14.17”) in diameter at the base and weighs 29kg (63.93 lb). It is currently being displayed at the Museum of London, however there are no known recordings of the bell’s chime tones. Based upon modern parametric formulas, this bell produces a nominal frequency of 2226 Hz, which corresponds with a C4# tone. My goal is to create a bell using the methods stated above, resulting in a bell that is 7” diameter at the base and creates the same tone as the Black Death Bell. Producing a smaller scale bell has been chosen for fiduciary consideration due to the cost of bronze materials, while still providing all the design and execution immersion of the original extant piece. Although only ½ of the diameter, the weight of the smaller bell must be around 3.5 lb to create the same tone. By parametric similitude, creating the same tone and dropping the profile dimensions by 50%, the overall weight must decrease to 5-1/2% of the original bell. For the medieval bell maker, he would have given his eye-teeth to be able to provide this parametric study prior to investing hundreds of man-hours creating trial bells. The science of bell sounds and the relationships between geometry and tone as cited here are further discussed in the Dissertation section below.
Materials:
For the most part, the elements used in creating the scaled bell are the same as detailed in Theophilus’ writing. Efforts have been made to utilize as much of the same tools and materials as was prescribed by Theophilus. The method of melting the metal is different for convenience and safety*.
Element Use | My Materials | Period Materials |
Profile Strickle (templates for the inside and outside bell profiles) | Louan plywood | Not stated in Theophilus’ work. Undoubtedly necessary in the process. Well documented in later works. |
Bell Turning Lathe | Oak Square Rod Oak Frame Steel Nails | Oak Square Rod Oak Frame Steel Nails |
Bell Turner | Electric Motor | “A boy” – Theophilus |
Core and Mold Material | Clay | Clay |
Lost-Wax Material | Beef Tallow and Bees Wax | Tallow and Bees Wax |
Crucible | Quartz | Clay |
Bell Bronze | 4 parts copper, 1 part tin | 4 parts copper, 1 part tin |
Clacker Support | Mild Steel Rod | Iron rod |
Bell Support | Mild Steel | Iron |
Bell Yoke | Oak and Steel rods | Wood (unspecified) and Iron rods |
Heat Source | Propane Gas* | Charcoal forge |
Utilizing These Materials:
The first effort in making the bell was to establish the inside and outside profiles. Since I had a picture of the Black Death Bell (BDB), I was able to scale it to where the base of the bell in the picture was 7” in diameter, which is my 50% scaled model from the original. The outside profile shape was then transferred to the Outside Strickle, or a piece of wood that is used as a pattern to shape a surface, The inside profile is not available for evaluation as it is housed unsupported in the Museum of London unhung, therefore recording its unimpeded tone is impractical. Therefore, creating it required reverse-engineering of my bell’s inner profile to create a bell that has the outer profile of the original BDB while creating a similar tone. In performing this reverse engineering, I modeled the outside profile in a Blender program for 3D modeling. Then I added thickness to this computer model shell in ½ mm increments, starting at 2mm thick, progressing up to 3.5mm thick. Each one of the subsequent shell models was imported into the Chitubox program as if it were to be printed on a 3-D printer. By creating a sliced model ready to be printed, the program was able to identify the amount and weight of plastic materials to be printed for that particular thickness. Since there is a 10:1 weight ratio between the plastic modeling material and bell bronze, I then was able to establish the weight of my finished bronze bell for each average thickness that I modeled.
I then utilized Biringuccio’s relationships for the bell ring lip thickness to the various thicknesses up the bell profile, the overall diameter of the bell, the height of the bell and the subsequent weight of the bell and incorporated these parameters into the final computer model. Thus once modeled, using the same approach as discussed above, the final weight and diameter was determined. Then it was a matter of determining the frequencies of the original bell and that of my Biringuccio bell.
Hibbert (4) has established an equation identifying the relationship of a bronze bell’s base diameter, weight, and primary frequency (Figure 4 and Equation 1). In creating this equation, he used the diameter/weight/frequency data of over 1700 historical bells, with the resulting equation having only one significant deviation among the 1700. Therefore, with a high degree of reasonable certainty, having two of these key parameters will result in being able to obtain the third. For the BDB, we have two, the weight and diameter. Therefore, the primary frequency is almost certainly obtainable. The Primary Frequency is synonymous with the bell’s tone which correlates to musical notes. There are usually five total dominant tones in a bell, as shown in Figure 3. I used Hibbert’s equation to establish the note produced by the BDB, as well as my bell at various average thicknesses. Thus, I created a parametric model of my ½ scale bell and established the volume and weight of metal needed to have my bell produce a similar tone to the original BDB.
The results of this parametric model are detailed in Table 1. The original BDB rings with a primary tone of C4#. At 3.5mm thick, my 50% scaled bell should produce the same tone. Once the average thickness and total mass were determined, I re-distributed the mass along the bell’s center axis to have a distribution described by Biringuccio. After determining the profile of the inner core, I transferred the image to the Inside Strickle and cut it out with a saw.
As described by Biringuccio, the inside profile strickle is placed on the core clay as it spins around the hand lathe, thus defining the inside profile of the bell. Once the tallow is applied to the core, the outer strickle is used to establish the outside profile by shaping the tallow layer as it is turned on the lathe. The difference of the area under the curve between the outside and inside Strickles ultimately defines the thickness of the metal along the axis of the bell. Theophilus does not detail the use of a Strickle in his writing. However, it is intuitively obvious that they would need to be used at bell foundries for repeating a pattern, and ultimately refining the tuning by differential manipulation of the profiles. Biringuccio also identifies that the use of the strickle method was used by the “Ancients”, thus this further supports that 12th Century bell founders would have used the same approach.
The approach specified by Theophilus for this casting was closely followed as he describes it. I built a wooden crank box, which included the crank handle (Figure 3). A nice, heavy brown clay was layered on the square shaft about two fingers thick and allowed to dry completely prior to adding another layer. I have added a 10% by weight of silica “grog” to the clay, as the brown clay is a high-fire clay, and the medieval clay would certainly be a low-fire clay full of sand impurities. This silicate addition significantly reduced the cracking associated with the clay drying. Once a substantial amount of clay was applied, I used the Inside Strickle to shape the core. I then mixed Beef Tallow with linseed oil in a 10:1 by weight mixture as Theophilus indicates. He did not specify the ratio, just the materials. I then applied the tallow to the core in generous proportions. Using the Outside Strickle, I shaped the tallow on the turning lathe to create the outside profile. After this profile was completed, I applied the artwork on the bell using carved bees wax, thus embossing the bell. The original BDB had the inscription “PETRVS: DE: VESTON: ME: FECIT’, which translates to, ‘Peter de Weston made me’. For my bell, I carved an Atlantian ‘Spike’ horned seahorse symbol, Queen Mary Isabel’s personal symbol, and the words, “MARY ISABEL REGINA – A.S. LVIII - ATLANTIA” I then knocked out the lathe crank arm and patched the hole from the arm at the top of the bell with clay. This created the base for allowing me to take a bent loop of steel rod and embed it into the center of the clay to where the ends of the loop intersect with the wax of the bell. Therefore, when the bell is cast, the steel loop is embedded in the bronze with the loop protruding to the inside of the bell and able to be utilized for hanging the clapper. Then, a patch of wax is placed over the clapper support, completing the crown of the bell. Then, a wax set of Canons is placed over the bell to support the bell after the casting. Again, the wax canons intersect with the wax bell so when the bronze is cast in its stead, the canons remain integral with the bell.
I then added a wax column and cup above the mold, which created the cup and gate to facilitate pouring the bell bronze into the void created by the lost wax. This is the passageway for the molten metal to be gathered and flow into the void once the wax is melted out. Great care is needed to ensure that the transitions between the cup and sprue, and the sprue and mold are rounded with graduated transitions so that eventually the bronze flows effortlessly into the cavity left by the wax. I applied wax rods from the cup to the bottom of the bell to act as vents to enable the air to escape while pouring in the bronze. I also applied cylinders of wax pointing down from the bottom of the bell to serve as drains to eventually drain the wax out of the void.
After the wax was complete, I sifted fine clay over the details of the wax so that all the nuances of the bell and embossed artwork could be captured. Once I was assured that the details were enclosed, I encapsulated that layer of clay with more course, sturdier clay. Once again, this was applied in layers so that each layer could dry and expel its moisture prior to applying a subsequent layer.
Once sufficient layers were applied, the mold was left to dry. Although this bell size and weight did not warrant the methods of handling a very heavy mold, I followed the process described by Theophilus to remove the wax from the mold and prepare it for bronze insertion. The mold was set (instead of a protracted lowering by subsequent extractions of soil) into a pit in the earth. It was surrounded by fire brick with channels below the export vents for the wax drainage. I set a fire around the mold to melt out the wax. Then plugs of clay were jammed into the vent holes and backfilled to secure the mold from draining bronze.
The copper of the bronze was placed in the crucible and heated to approximately 100C beyond the melting point of the material (1091C) within a gas forge using a modern pyrometer for measuring the temperature. This would have been performed in a coal-fired forge using bellows in Theophilus’ methods. However, for safety reasons and expediency, a gas forge was utilized. Once melted, the tin was added in a 4:1 ratio, thus creating Bell Bronze. The crucible was then poured into the cup of the mold, paying special attention to the sound of the pour to ensure there were no air pockets entrapped within the mold.
After completing the pour and giving the metal sufficient time to solidify the mold was extracted from the ground and the core hollowed out. This provided a relief for the metal expansion. Then after sufficient time for the metal to completely cure within the mold, the outer shell was removed with picks, hammers and axes to reveal the finished bell.
The yoke for supporting the bell was created by Theophilus’ techniques, and further drawn out by Theobald1. The period materials were used in creating this harness. The final bell was mounted on a frame for display. As is custom with extensive medieval artistic endeavors, a praise is given to the inspiration for this endeavor on the conclusion of the exercise. Vivat Queen Mary Isabel for the inspiration to embark on this endeavor.
Results:
TBD
Conclusions:
TBD
Dissertation of Geometric-Acoustic Relationships of Bells:
Bell bronze is a mixture of 4 parts copper with 1 part tin by weight. This alloy has been established for hundreds of years as the ideal mixture of components to produce a clear, bright tone in a bell. The relationship of the weight of bell bronze to wax is 10:1. Therefore, when estimating the weight of the final bell casting, one can pre-determine the weight by the amount of wax used within the mold.
In the 12th Century as recorded by Theophilus, the relative tone of bells could be coordinated by using specific ratios of the wax weight when creating the various bells within a harmonic progression (scale). He specifically utilized these ratioed weights when producing smaller hand bells, or cymbala. The wax weights for producing bells in a scale were ratioed as follows (‘a’ being an arbitrary weight, creating an arbitrary note):
a | a |
G | 9/8a |
F | 9/8G |
E | 4/3a |
D | 9/8E |
C | 3/2G |
B | 4/3E |
S | 3/2F |
A | 2a |
Although the tonal progression would be relatively accurate during this period by only measuring ratios of the weights between bells, the starting tone of the root bell would be suspect without additional parameters. At this time, bell founders had historically established, experimentally derived bell profiles to generate the root tone for which all subsequent chorus bells would be generated with the wax weight ratios.
A regression fit for the 7,165 bells in this analysis, gives the following formulae:
w ≈ 0.927 X f ^(0.96) X d ^(3.87) for bronze bells (Equation 1)
Bibliography:
1. Hawthorne, John G Theophilus - On Divers Arts The Foremost Medieval Treatise on Painting, Glassmaking and Metalwork Dover Publications, London 1963 ISBN 048623784
2. Cyril Stanley Smith and Martha Teach Gnudi - The Pirotechnia of Vannoccio Biringuccio: The Classic Sixteenth-Century Treatise on Metals and Metallurgy, Dover, 2006
3. The Black Death Bell, by Peter de Weston ca 1340, Museum of London, ID -72.191
4. Bill Hibbert – Building a Bell Sound – https://www.hibberts.co.uk/building-a-bell-sound/, 1/2/2022
Figures and Tables:

Figure 1: The Black Death Bell created by Peter de Weston ca 13403

Figure 2: Hand Lathe for Turning the Bell – Theophilus1

Figure 3: The key tones of a bell with their amplitude and frequency characteristics4

Figure 4: Weight/Diameter Correlations for 7165 Historical bells - Hibbert4
Shell Thickness (mm) | Original | 2 | 2.5 | 3 | 3.5 |
Diameter (in) | 14.17 | 7 | 7 | 7 | 7 |
Weight (lb) | 63.93 | 2.5 | 3 | 3.6 | 4.2 |
Nominal Frequency (Hz) | 2226 | 1306 | 1579 | 1909 | 2241 |
Fundamental Freq. (Hz) | 1113 | 653 | 789 | 954 | 1121 |
1/2 Fund. Freq (Hz) | 557 | 326 | 395 | 477 | 560 |
Note | C# | E | G | B+ | C# |
Octaves | |||||
Notes | 1 | 2 | 3 | 4 | 5 |
C | 32 | 65 | 130 | 261 | 523 |
C# | 34 | 69 | 138 | 277 | 554 |
D | 36 | 73 | 146 | 293 | 587 |
D# | 38 | 77 | 155 | 311 | 622 |
E | 41 | 82 | 164 | 329 | 659 |
F | 43 | 87 | 174 | 349 | 698 |
F# | 46 | 92 | 185 | 369 | 739 |
G | 49 | 98 | 196 | 392 | 784 |
G# | 52 | 104 | 208 | 415 | 830 |
A | 55 | 110 | 220 | 440 | 880 |
A# | 58 | 116 | 233 | 466 | 932 |
B | 61 | 123 | 246 | 493 |
Table 1: Parametric Study Results for Resulting Bell Tone by Thickness

The Hand Lathe Position Lock
The Hand Lathe

The Inside and Outside Strickles
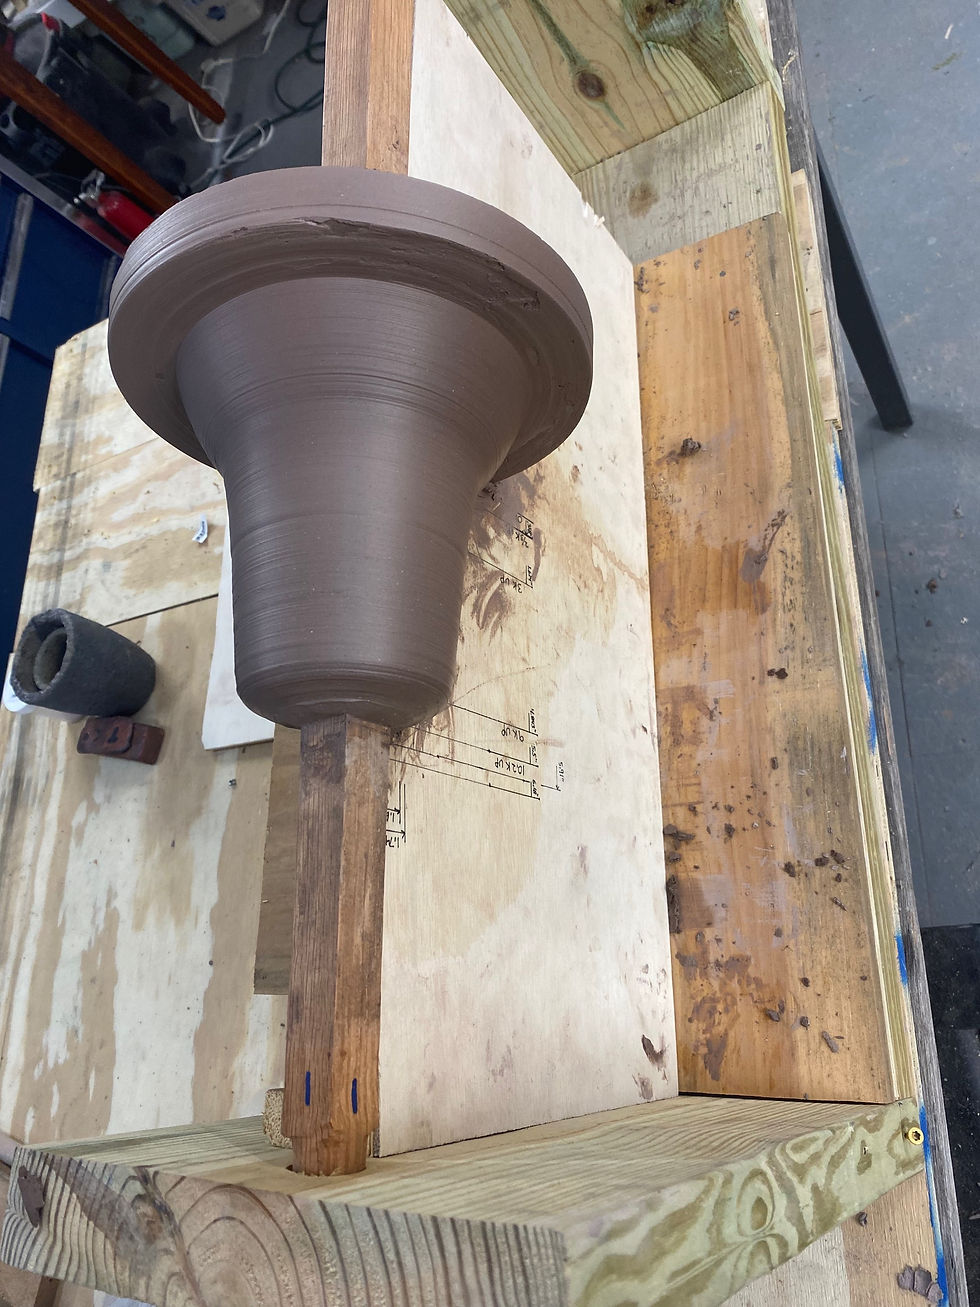
Inner Core Being Turned & Shaped by Strickle

Inside of 3D Printed Model for Parametric Study

Outside of 3D Model for Parametric Study

3D Model for size presentation with Canons


Comments